dissabte, 9 de desembre del 2017


Configuration of the CentOS 7 to be accesible the deamon from outside

Stop Docker

[root@localhost jordi]# systemctl stop docker

[root@localhost jordi]# cat /lib/systemd/system/docker.service

look at the

ExecStart=/usr/bin/dockerd

It is risky touch direcly the file direcly there is a edit utility in linux services

systemctl edit docker

[Service]
ExecStart=
 ExecStart=/usr/bin/dockerd -H tcp://0.0.0.0:2375 -H unix:///var/run/docker.sock

 finally start docker

[root@localhost jordi]# systemctl start docker
[root@localhost jordi]# systemctl restart docker
[root@localhost jordi]# curl http://localhost:2375 {"message":"page not found"}
[root@localhost jordi]# docker run ubuntu echo "helo world" helo world


Remember set up the firewall, A rapid to way this issue around is disable it

[root@localhost jordi]# systemctl disable firewalld

dimecres, 6 de desembre del 2017

Tomcat embed with anotated Servlet

Recently I have playing in with the Tomcat embed version. Currently Spring Boot gives a fancy, easy and rapid creation of the Main class invoking a instanting a Tomcat server. However there is a lack of official information that it makes me doubt about of readiness for production. I belive that the classic war and deployment it is going to be safer in the future and it of course much more portable . But an embeded version can have a futture for testin. I will chose war solution for cloud PaaS envirotments or container solutions such us Cloud Foundry unless Apache will decide to publich formal and clear documentation. Spring give us a OSGI version which wrap tomcat, this seeems be valid for production but Spring is Spring and I personally hate it because they reinvent the heel constantly, I lke JEE a littel bit more but my feeling is that you will never be safe either Spring nor JEE.

It is my intention to do the same test but in a JEE cointainer like Payara or Payara-micro which give us much better documentation.

Having said that. Here is the issues or poblems that I found. My goal was instanciate a Tomcat with a anotated Servlet with no web.xml and no adding explicti Servlet at all. Remember Servlet 3.0 support is a must and tomcat +7 is necessary.

I built the solution using gradle but only with java plugin, the first issue was find out the exacly dependences.

The dependeces list are in the build.gradle but is intersted notice that not all the tomcat versions worked. Also be carefull in that you maven or gradle include the anotations solution for Tomcat otherwise you can face issues.


    compile  "org.apache.tomcat:tomcat-catalina:$tomcatVersion"
    compile  "org.apache.tomcat:tomcat-util:$tomcatVersion"
    compile  "org.apache.tomcat:tomcat-jasper:$tomcatVersion"
    compile  "org.apache.tomcat:tomcat-jasper-el:$tomcatVersion" 
    compile  "org.apache.tomcat:tomcat-jsp-api:$tomcatVersion"
    compile  "org.apache.tomcat.embed:tomcat-embed-core:$tomcatVersion"
    compile  "org.apache.tomcat.embed:tomcat-embed-logging-juli:$tomcatVersion"
    compile  "org.apache.tomcat.embed:tomcat-embed-jasper:$tomcatVersion"

To be the Servlet reconzied your tomcat classpath must have the class but also the context must have the access to the servlet.class file. The easy and standart way to achieve this is include the class inside of jar file and execute it using java -jar my.jar along with all the dependences uncompress in the same jar file.

To achieve this in gradle I used the shadow gradle plugin, in Maven you can achieve the same with the maven-assembly-plugin

to run the sample the sources are in  https://github.com/jordiesc/java/tree/master/embedtomcat/JavaTomcatEmbed

$ gradle build shadowJar
$ cd build/libs
$ java -jar GroovyTomcatEmbed-all.jar

https://github.com/jordiesc/java/tree/master/embedtomcat/GroovyTomcatEmbed

Moreover you will see two versions of the project. they are almost identical apart form some details. The most important is the groovy incompatibility with Java annotations. where you must to turn curly bracktest {} into [] otherwishe the compiler will interpret a Groovy Clousre

The Java way

@WebServlet(
    name = "dataServlet",
    urlPatterns = {"/datajava"}
)

The Groovy way

@WebServlet(
    name = "dataServlet",
    urlPatterns = ["/datagroovy"]
)

just run http://localhost:8080/datajava or http://localhost:8080/datagroovy

diumenge, 12 de novembre del 2017

CSS POSITON.

STATIC. es el posicionamiento por defecto del navegador poniendo los elementos segun aparecen en el html, dom. es como si no hubiera posicionamiento. si se pone static el navegador no hace caso de los left,right,top, botton.

RELATIVE el navegador conserva el espacio que habia despues de moverlo. los porcentages solo funcionan si esta el heigh del padre. Es inportante saber que el espacio dejado despues de desplazarse continuara reservado
ABSOLUTE. los elemenos se posicionan en base a su inmediato padre , posicionado, o sea que tiene posiciones relative,absolute o fixed. El espacio no es reservado.
El ancho de un elemento absolute depende de su contenido.

FIXED. como absoluta no reserva la posicion, se ajusta al contenido las cordenatdas se calculan segun el navegador o ventana asi que  nunca se escrolla. los elementos fixed quedan fijos pero se salen del flujo de colocacion.

Posicionamiento por ejes

Siempre son posiciones desplazadas desde el margen hacia adentro. Por ejemplo top 2px moviera el elemento desde el top hacia el centro o sea hacia abajo

Solo puede haber un posicionamiento vertical y uno horizonal, css solo toma uno si hay varios.

Horizontal left, right
Vertical -> top, botton

3 dimension- z-index

MARGIN collapse.

Los top and bootion margin colapsan. con elementos posicionados absoluto no colapsan https://developer.mozilla.org/en-US/docs/Web/CSS/CSS_Box_Model/Mastering_margin_collapsing

dilluns, 6 de novembre del 2017


Groovy con Gradle

Hay una manera facil de ejecutar Groovy scripts sin llegar a instalar Groovy si se tiee Gradle

$ gradle init

Genera un proyecto gradle. El fichero build.gradle

task inicio{}

println "hola mundo"
h

con el comando gradle inicio. se vera la siguiente salida

$ gradle inicio
hola mundo
:inicio UP-TO-DATE

BUILD SUCCESSFUL in 1s


task inicio{}

def lista = ["uno","dos",3]

lista.forEach {
println it
}
produce

$ gradle inicio
uno
dis
3
:inicio UP-TO-DATE

BUILD SUCCESSFUL in 1s

divendres, 1 de setembre del 2017


Los webcomponents son la base de los ultimos frameworks aparecidos como Angular 2 o 4, Polymer, Aurelia, X-tag e incluso React tiene una aire.

Todos hacen lo mismo encapsulan html modularmente y bindean objetos de datos.

Vanilla ES6 permite escribir web compoents NATIVOS, esto quiere decir mas rapidos en ejecucion y mas entendibles pq no hay magia. Por contra habra que hacer un poquito mas de codigo para el binding de datos pero con ES6 las arrows y typescript tampoco es que sea muy dificil.

Como son NATIVOS se pueden incorporar en todos los frameworks, y como son NATIVOS van a durar mucho mas que no los frameworks q tienen un ciclo de vida de 2 añitos.Y nos olvidaremos de migraciones

Para los navegadores que no soportan WC nativos ya hay polyfills. Es mas todos los frameworks anteriores o incorporan el mismo polyfill o lo has de poner.

La especificación de webcomponents y en concreto los Custom Elements se puede ver en los enlaces de abajo

https://html.spec.whatwg.org/multipage/custom-elements.html#custom-elementss

y un fantastico enlace en castellano

https://developers.google.com/web/fundamentals/getting-started/primers/customelements

Los custom elements llevan el gion normalmentepor ejemplo <my-app></my-app>. Eso es parte de la especificacion.

Lo basico es crear una clase que extienda de HtmlElement o del element que sea HtmlButton... y implementar algunas de las funciones para interctuar con el DOM.

Para poner atributtos en el htmlelement se deben de declarar con get y set.

get attributename()
set attributename()

Si ademas queremos que esos atribures notifiquen a nuestra clase cuando se cambian hay que declarar el array

static get observableattributes y despues el metodo attributeChangedCallback

Mi personal test con custom elelments v1 que incluye dos custom tags y con sus porpios eventos

https://github.com/jordiesc/webcomponents

dilluns, 28 d’agost del 2017

Typescript basic setup for webcomponents


Install globally TypeScript with
npm install -g typescript

create tsconfig

/customElements/typedelement $ tsc -init
message TS6071: Successfully created a tsconfig.json file.

Edit the tsconfig.json in the compile section set.

  "compilerOptions": {
    /* Basic Options */
    "target": "ES2015",

to develop and automatically compile tsc -w it will create a foo.js from each foo.ts.

Enjoy!!!

dimarts, 25 de juliol del 2017


npm change global path to prevent the sudo use


change the default global path. Ie the -g option under npm -g install


 cd ~ && mkdir .node_modules_global
 npm config set prefix=$HOME/.node_modules_global

echo 'export PATH=$PATH:$HOME/.node_modules_global/bin'  >> ~/.bash_profile

Source https://docs.npmjs.com/getting-started/fixing-npm-permissions

 
to refreh source .bash_profile to avoid logoff and login. 

Then is easy install ng client and use it

npm install -g @angular/cli


divendres, 7 de juliol del 2017

Apache web server httpd basicos

instalacion basica en CentoS, en debians es apt-get install http2

yum install httpd, No obstante otra manaera muy habitual es utilizar el web group

yum group install "Web Server" ya que instala los modulos basicos mas importantes y utulies. Para ver los que installa.

[root@10c2d74505b9 /]# yum group info "Web Server"


Una vez instalado ver la configuraicon basica V Mayusculas

[root@3602f72e023a /]# httpd -V
AH00558: httpd: Could not reliably determine the server's fully qualified domain name, using 172.17.0.2. Set the 'ServerName' directive globally to suppress this message
Server version: Apache/2.4.6 (CentOS)
Server built:   Apr 12 2017 21:03:28
Server's Module Magic Number: 20120211:24
Server loaded:  APR 1.4.8, APR-UTIL 1.5.2
Compiled using: APR 1.4.8, APR-UTIL 1.5.2
Architecture:   64-bit
Server MPM:     prefork
  threaded:     no
    forked:     yes (variable process count)
Server compiled with....
 -D APR_HAS_SENDFILE
 -D APR_HAS_MMAP
 -D APR_HAVE_IPV6 (IPv4-mapped addresses enabled)
 -D APR_USE_SYSVSEM_SERIALIZE
 -D APR_USE_PTHREAD_SERIALIZE
 -D SINGLE_LISTEN_UNSERIALIZED_ACCEPT
 -D APR_HAS_OTHER_CHILD
 -D AP_HAVE_RELIABLE_PIPED_LOGS
 -D DYNAMIC_MODULE_LIMIT=256
 -D HTTPD_ROOT="/etc/httpd"
 -D SUEXEC_BIN="/usr/sbin/suexec"
 -D DEFAULT_PIDLOG="/run/httpd/httpd.pid"
 -D DEFAULT_SCOREBOARD="logs/apache_runtime_status"
 -D DEFAULT_ERRORLOG="logs/error_log"
 -D AP_TYPES_CONFIG_FILE="conf/mime.types"
 -D SERVER_CONFIG_FILE="conf/httpd.conf"
[root@3602f72e023a /]#


  • El fichero importante de cofiguracion es httpd.conf. Se pueden tener otros *.conf por ejemplo my aplicaicon.conf
  • ServerRoot "/etc/httpd" root of path base de toda la configuratcio
  • VirtualHost sirve para apuntar varias direcciones a un solo apache, por ejemplo imaginemos un servidor serv1 con dos dns y dos ips www.una.com y www.dos.com podriamos uno con ssh y la otra sin. se puede configurar dos virutals host cada una con su configuracion y atacar al mismo contenido.
  • Los modulos se activan o desactivan en Centos /etc/httpd/conf.modules.d 


Para reinciar apache via systemctl sudo systemctl restart httpd.service. En centos hay un servicio especifico para apache httpdctl que es lo mismo que systemctl httpd. httpdctl grateful reinicia órdenadamente el apache sin pararlo.

Apache y ajp Tomcat connector. si queremos redirigir las llamadas a tomcat pero no de los ficheros la opcion revsereProxy no es la buena y para ellos se utliza el ajp conector.

Python in Eclipse PyDev with virtualev.


Create a virtaulenv.

in windows is virtualenv nameofviiratulenv.

later to active execute /nameofvirtualenv/Scripts/activate. Be carefull from dos or powershell not mingw64.

C:\Users\jordi\personal\workarea\machlearning>virtualenv machilearning
Using base prefix 'c:\\users\\jordi\\appdata\\local\\programs\\python\\python35'
New python executable in C:\Users\jordi\personal\workarea\machlearning\machilearning\Scripts\python.exe
Installing setuptools, pip, wheel...done.


to activate the envirotment ejectue the Scripts\activate in windows in linux is source activate


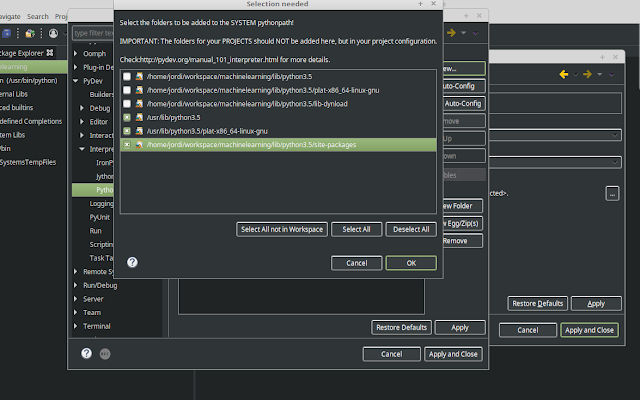
Once eclipse installed and its plugin PyDev. Point the interpreter adn do not forget the site-packages

Preferences -> PyDev -> Interpretes ->


dijous, 18 de maig del 2017


Docker Remote

Docker Daemon allows to you to access remotelly via API, by default is not active and you have to do a samll configuration. The normal use case is using docker-machine in order to create docker machines, but in enterprise envirotmenst not allways is allowed to install software even less docker software. However the developers may still need to conect to docker daemon to have a test envirotment. Below the stesps to provide a docker daemon a http API conection, enoguth to work with Eclipse or Netbeans

Below is explained the stpes done in Unbutu

First stop the docker service. 

service docker stop

Later change the dockerd parameters. There is the option to create a etc/docker/daemon.json but you still are going to need to change the docker.servie since dockerd is started with fd option. And if you try creating daemon.json with "hosts" options it will give an error asking to you to decide either json or dockerd parameteres.


root@ubuntu:/# vi /lib/systemd/system/docker.service

#ExecStart=/usr/bin/dockerd -H fd://
ExecStart=/usr/bin/dockerd -H tcp://0.0.0.0:2375  -H fd://

Flush the changes.
systemctl daemon-reload
service docker start

root@ubuntu:/etc/docker# service docker status
● docker.service - Docker Application Container Engine
   Loaded: loaded (/lib/systemd/system/docker.service; enabled; vendor preset: enabled)
   Active: active (running) since Thu 2017-05-18 01:00:59 CEST; 8s ago
     Docs: https://docs.docker.com
 Main PID: 4117 (dockerd)
    Tasks: 16 (limit: 4915)
   Memory: 30.6M
      CPU: 2.003s
   CGroup: /system.slice/docker.service
           ├─4117 /usr/bin/dockerd -H tcp://0.0.0.0:2375 -H fd://
           └─4121 docker-containerd -l unix:///var/run/docker/libcontainerd/docker-containerd.sock --metrics-interval=0 --start-timeout 2m --state-dir /var/run/docker/l

to verify that docker is running and giving info curl

-X GET http://127.0.0.1:2375/images/json

Only remain Eclipse, Netbeans is exacly de same. It consists only on connect to the daemon


To look up images and containers there is a nice wizard and list.


dilluns, 1 de maig del 2017

Primeros pasos con Docker.


 Buenisismo (corto, practico, con algo de teoria y poco ppt) curso de docker dado en la propia web de docker 
https://training.docker.com/introduction-to-docker
https://training.docker.com/docker-fundamentals
https://training.docker.com/docker-operations

Primeros pasos


Seguir las directrices https://docs.docker.com/engine/installation/linux/ubuntu.

Hemos instalado un unbutu 16 en virtual box con 16GB de disco y 4GB de memoria. Una vez levantada la maquina installar docker ocmo indica las directrizes que como es facil. Una opcion mejor es ir a docker store https://store.docker.com/editions/community/docker-ce-server-ubuntu?tab=description. estas instrucciones instalan una version mas actualizada

Agregar el usuario al grupo docker para evitar ir haciendo sudo

jordi@ubuntujordi:/$ sudo usermod -aG docker jordi. Despues salir para que pille los cambios logout


y ya se podra acceder sin ir poniendo sudo


jordi@ubuntujordi:~$ docker run hello-world.


para salir del container cntl +p +q

Otro ejemplo es

 docker run -it ubuntu:14.04 bash. Los parametros it significan terminal mas stout, y bash es el comando que ejecuta. Obervar que para salir exit, una vez hecho no se guarda nada, si se crea un usuario se "pierde" .

Ejemplo de ejecutar un contender y dejarlo corriendo.

# docker run -d -P tomcat:7 . La d es "detached mode" para no quedar atrapado.

docker ps saca las imagenes y su estado 

root@ubuntu:/home/jordi# docker ps -a
CONTAINER ID IMAGE COMMAND CREATED STATUS PORTS NAMES f6bad8210e61 tomcat:7 "catalina.sh run" 2 minutes ago Up 2 minutes 0.0.0.0:32768->8080/tcp dreamy_volhard dca00ddfe6c8 ubuntu:14.04 "bash" 22 minutes ago Up 22 minutes hopeful_jang lo que significa que el redireccionamiento de puertos esta asi 0.0.0.0:32768->8080/tcp root@ubuntu:/home/jordi# curl http://127.0.0.1:32768 Sacara una cosa fea

Docker fundamentals 

 Construir imagenes, Un poco de teoria. Las imagenes se montan a base de capas, cada layer o capa es a su vez una imagen. La estrucutura de capas sirve para simplificar la instalacion y publicacion de imagenes y asi 'dividir' y acutalizar solo la capa nueva que forma una imagen.

Una vez lanzado un contaner en detach mode podremos volver lanzando comandos

jordi@ubuntu:~$ docker ps
CONTAINER ID        IMAGE               COMMAND                CREATED              STATUS              PORTS               NAMES
86d8efeabe8f        tomcat:7            "ping www.google.es"   About a minute ago   Up 2 seconds        8080/tcp            angry_torvalds
jordi@ubuntu:~$ docker exec -it 86d8efeabe8f bash
root@86d8efeabe8f:/usr/local/tomcat#


dokcer linking para comunicar contarines
docker volumetes.


Hay DOS maneras de crear imagenes
  • ejecutando un commit sobre la imagen por ejemplo  $ docker commit ec221eabd2e3 jordiesc/mitest:1.
  • La otra es con un fichero llamdos dockerfile. 
Las imagenes se guardan en Docker registros, los registry pueden ser publicos o privados . El publico mas famoso es DockerHub. solo considerar en que para produccion solo utilizar imagenes oficiales, que tienen el simbolito de la ballena.

Es posible crear un registro local via docker en si mismo

 jordi@ubuntu:~$ docker run -d -p 5000:5000 registry:2.0. Despues para pull o push imanges hay que hacer referencia al server docker push name.com:5000/repositoryname:tag. para poner regstry remote hay que configurar TLS si no da error otra opcion es establecer --insecure

sudo service docker stop.
/etc/defult/docker DOCKER_OPTS="--insucure-registry ipregistry:portregistry".
sudo service docker start y con eso se activa el insecure.

Docker orchestration

  •  DockerMachine es un tool para orquestrar docker machines en remoto desde un pc. Para instalar descargar los binarios desde aqui y situarlos en los binarios del $PATH usualmente en /usr/local/bin/docker-machine con permsios chmod+x para poder ejecutarlos
 wget
https://github.com/docker/machine/releases/

Con docker machine se puede installar docker en instancias virtuales de varios vendedores y levandar contenedores con la misma API e interfaz.  La verdad es que no acabo de verle la utilidad excepto para entornos multicloud.

  • Docker Swarn. Tool para clusterizar docker machines y tratarlos como una unidad. Parecido a Kubernettes. Cada nodoe thiene que tener swarn agent y hay un swarn Manager o master. el swarn manager o master es un docker container en si mismo asi como los agentes,

docker run -rm swarn create

  • Docker compose es una tool para mangegar multcontainer aplicaicones. Que es lo mas normal con compose se puede spinup todos los containers como una unidad. se crea un fichero yaml y se pone todos los contendedores con las referencias
Instalacion de docker compose basicamente es bajarse y ponerlo en usr/local/bin q es donde estan los ejecutables

curl -L https://github.com/docker/compose/releases/download/1.12.0/docker-compose-`uname -s`-`uname -m` > /usr/local/bin/docker-compose
despues le damos permisos de ejecucion  sudo chmod +x /usr/local/bin/docker-compose

el funcionamiento basico es tener un fichero docker-stack.yml y con el compando docker-compose up


Apache Tomcat/7.0.77

dilluns, 17 d’abril del 2017

Open Stack Orchrestation HEAT

HEAT is the OpenStack Module to provide rapid creation with templates. Whith temaplates you can build a ylm file whit all the specification neeeded to launch a complete tenant user whit all the components that a Open stack has such us networinkn, Load Balancers etc alll in a simple configuration file.

Heat allow to put parameters to be full filled for the end user once he launch a Open Stack.

REVERSE ENGINERING

However a very common user case is when a user already has a Open Stack tenant created and he want to redeploy the same envirotmetn or just to have a backup envirtoment file. Open Stack does not have a way to export as a Heat file directly. For that we can use a flame utlity to create the heat file yaml

sudo pip install python-flameclient
source xx-openrc.sh
flame --insecure >> yourfile.heat

The file created can be imported using horizont. The only issue we have detected is the allocation of the floats ips.

Sample file

### Heat Template ###
description: Generated template
heat_template_version: 2013-05-23
parameters:
  external_network_for_floating_ip_0:
    default: 1fd0a21e-e700-46ae-9f05-0b3164daafcc
    description: Network to allocate floating IP from
    type: string
  router_0_external_network:
    default: 1fd0a21e-e700-46ae-9f05-0b3164daafcc
    description: Router external network
    type: string
  server_0_flavor:
    default: m1.smaller
    description: Flavor to use for server server_0
    type: string
  server_0_image:
    default: 76f5f4aa-a78f-4703-b738-cab967957431
    description: Image to use to boot server server_0
    type: string
resources:
  floatingip_0:
    properties:
      floating_network_id:
        get_param: external_network_for_floating_ip_0
    type: OS::Neutron::FloatingIP
  floatingip_association_0:
    properties:
      floating_ip:
        get_resource: floatingip_0
      server_id:
        get_resource: server_0
    type: OS::Nova::FloatingIPAssociation
  key_0:
    properties:
      name: jordi
      public_key: ssh-rsa AAAAB3 ...
        Generated-by-Nova
    type: OS::Nova::KeyPair
  network_0:
    properties:
      admin_state_up: true
      name: jordinet
      shared: false
                      

dissabte, 11 de març del 2017

Como que estoy repasando y profundizando el RSA y la criptografia, me planteo como escribir matematicas, cosa que nunca he hecho en ordenador, Hay una libreria java script muy chula que permite escriber Tex con MathJax.


$[a]=\{x\in A: a\sim x\},$ $$[a]=\{x\in A: a\sim x\},$$ \( [a]=\{x\in A: a\sim x\},\)

divendres, 3 de març del 2017


Programing with the OpenStackClient.

Due the fact that all the documentation regarding the neutront is mentioning the old neutron pakcage
and this packge is not installed in the default openstackcli so it is necessary to get access to the package neutronclient.v2_0


pip install python-openstackclient

pip install python-neutronclient.


To run the code you have to download the credentiansl and executhe the sh whith source in order to keep the envirotmetn varibles in your session.

source yourcredentials.sh


Below a simple program which creates the security rules, security rules are something very similar to a firewall. You need to create at least one security rules and open ports and protocols in order to connect with your VM.

Do not forget the icmp in order to allow the routing towards the virtual instances.

to run tihis code


'''
Created on Feb 26, 2017

@author: jordi
'''
from os import environ as env


from keystoneauth1 import session
from keystoneauth1 import loading
from novaclient import client
import logging


logging.basicConfig(level=logging.ERROR)


loader = loading.get_plugin_loader('password')
auth = loader.load_from_options(
                    auth_url=env['OS_AUTH_URL'],
                   username=env['OS_USERNAME'],
                   password=env['OS_PASSWORD'],
                   tenant_name=env['OS_TENANT_NAME'],
                  
                   )
sess = session.Session(auth=auth,verify=False)
nova = client.Client('2',session=sess)

nova.security_groups.create(name="web", description='jordi servers')
group = nova.security_groups.find(name="web")
nova.security_group_rules.create(group.id, ip_protocol="icmp",from_port=-1, to_port=-1)
nova.security_group_rules.create(group.id, ip_protocol="tcp",from_port=80, to_port=80)
nova.security_group_rules.create(group.id, ip_protocol="tcp",from_port=8080, to_port=8080)
nova.security_group_rules.create(group.id, ip_protocol="tcp",from_port=443, to_port=443) 


The result in OpenStack Horizont.


However this API has because there is not egreess option. To solve it is better use the new OpenStackSdk. Next entry

divendres, 17 de febrer del 2017


Create Certificate and Tomcat set up

First in order to do all the test we need to create or get a certificate. In Java platfform is quite easy.with the keytool which comes with every jdk. However in case of one way is more usual use a CA certificate- They usually delivery in pkcs12 format. keytool allow import this format of certificates. If not OpenSSL is a good tool to do lot of transformations


jordi@DESKTOP-V6S41NL MINGW64 /c/Program Files/Java/jdk1.8.0_111/bin
$ ./keytool -genkey -alias testcert -keyalg RSA -keypass testcert -storepass testcert -keystore c:/temp/keystore.jks
What is your first and last name?
  [Unknown]:  test
What is the name of your organizational unit?
  [Unknown]:  test
What is the name of your organization?
  [Unknown]:  test
What is the name of your City or Locality?
  [Unknown]:  test
What is the name of your State or Province?
  [Unknown]:  test
What is the two-letter country code for this unit?
  [Unknown]:  test
Is CN=test, OU=test, O=test, L=test, ST=test, C=test correct?
  [no]:  y

After to enable one way in Tomcat server.xml, the below is in Tomcat 9

 <Connector port="8443" protocol="HTTP/1.1" SSLEnabled="true" maxThreads="150"
 scheme="https" secure="true" clientAuth="false" keyAlias="testcert"
 sslProtocol="TLS" keystoreFile ="c:/temp/keystore.jks"
 keystorePass="testcert" truststoreFile="c:/temp/keystore.jks"
 truststorePass="testcert"/>

Just set clientAuth="true" to enable double authorization or two way.

dimecres, 8 de febrer del 2017


Mis primeros lambdas expresions


Es la hora de mis primeros 'hola mundos' de lambdas. En el ejemplo se ve una lambda que necesita para compilar una interfaz. Nos podemos evitar compilar si utilizamos algunas de las interfaces ya hechas en el paquete java.util.function

package com.test;

public class Inicio {

public static void main(String[] args) {
System.out.println("metod Inicio");
MyLambda lamba = (String a) -> {
int i = a.length() ;
return i;
};
Thread th = new Thread(
new Runnable() {
@Override
public void run(){
System.out.println("dentro del thread");
};
});
Thread th2 = new Thread( () -> System.out.println("en el segudo thread"));
System.out.println(lamba.longitud("hola caracola"));
th2.start();
th.start();

}
public interface MyLambda {
public int longitud(String a) ;

}

}

dimarts, 31 de gener del 2017

WMQ INSTALLATION

To install WMQ in debian distributions is needed to install rpm.


sudo apt install rpm
dpkg -l rpm
sudo ./mqlicense.sh -text_only
rpm -ivh --nodeps --force-debian MQSeriesRuntime-*.rpm
sudo rpm -ivh --nodeps --force-debian MQSeriesRuntime-*.rpm
sudo rpm -ivh --nodeps --force-debian MQSeriesServer-*.rpm MQSeriesJRE-*.rpm MQSeriesJava-*.rpm
vim /tmp/mqconfig.4914.log
sudo rpm -ivh --nodeps --force-debian MQSeriesExplorer-*.rpm
sudo rpm -ivh --nodeps --force-debian MQSeriesSamples-*.rpm
sudo rpm -ivh --nodeps --force-debian MQSeriesMan-*.rpm

You must create user and group mqm 

sudo groups mqm.

It is convenien to add users to this new group. To do the PoC simplier poosible add password to the user mq. and use it for JMS classes to open the connection.

BASIC STEPS

Create a MQ Manager .
 Create a Queue.
Create a listener (possible to do it in one este whith Mq Explorer).
Create a channel.

MQ COMANDS

   /opt/mqm/bin/crtmqm TESTMGR, Create a que manager
  /opt/mqm/bin/strmqm TESTMGR  Start a que manager

MQ EXPLORER 

Handy tool to avoid comand use.

TROUBLESHOTING

Logs are not directly visible, you need to translate them.

/opt/mqm/bin/strmqm TESTMGR
 .

 TWO CONCEPTS

  • mq queues

    Point to point comunications. Very frecuent to comunicate opens systems with Mainframe which a common use for WMQ in SOA architectures.
  • mq topics 

    One publish and multiple subscribers
BASIC JAVA stand alone  MQ END POINT

Take the jars located inside of MQ Installation and create two basic main programs to run separetely first the sender JmsProductor and then the JmsConsumidor

you can do a simply copy paste and run them witht the jars.


package org.jms.test;
import java.io.BufferedReader;
import java.io.IOException;
import java.io.InputStreamReader;

import javax.jms.Connection;
import javax.jms.Destination;
import javax.jms.JMSException;
import javax.jms.MessageProducer;
import javax.jms.Session;
import javax.jms.TextMessage;

import com.ibm.msg.client.jms.JmsConnectionFactory;
import com.ibm.msg.client.jms.JmsFactoryFactory;
import com.ibm.msg.client.wmq.WMQConstants;

public class JmsProductor {

  private static String host = "localhost";
  private static int port = 1415;
  private static String channel = "PROVA";

  private static String queueManagerName = "PROVA";
  private static String destinationName = "PROVA";
  private static boolean isTopic = false;
  private static boolean clientTransport = true;

  // System exit status value (assume unset value to be 1)
  private static int status = 1;

  /**
   * Main method
   *
   * @param args
   */
  public static void main(String[] args) {
    // Parse the arguments
    //parseArgs(args);

    // Variables
    Connection connection = null;
    Session session = null;
    Destination destination = null;
    MessageProducer producer = null;

    try {
      // Create a connection factory
      JmsFactoryFactory ff = JmsFactoryFactory.getInstance(WMQConstants.WMQ_PROVIDER);
      JmsConnectionFactory cf = ff.createConnectionFactory();

      // Set the properties
      cf.setStringProperty(WMQConstants.WMQ_HOST_NAME, host);
      cf.setIntProperty(WMQConstants.WMQ_PORT, port);
      cf.setStringProperty(WMQConstants.WMQ_CHANNEL, channel);
      if (clientTransport) {
          cf.setIntProperty(WMQConstants.WMQ_CONNECTION_MODE, WMQConstants.WMQ_CM_CLIENT);
      }
      else {
          cf.setIntProperty(WMQConstants.WMQ_CONNECTION_MODE, WMQConstants.WMQ_CM_BINDINGS);
      }
      cf.setStringProperty(WMQConstants.WMQ_QUEUE_MANAGER, queueManagerName);
      cf.setStringProperty(WMQConstants.USERID,"jordi");
      cf.setStringProperty(WMQConstants.PASSWORD,"zzzz");
     // cf.setBooleanProperty(WMQConstants.USER_AUTHENTICATION_MQCSP, false);
  

      // Create JMS objects
      connection = cf.createConnection();
      session = connection.createSession(false, Session.AUTO_ACKNOWLEDGE);
      if (isTopic) {
        destination = session.createTopic(destinationName);
      }
      else {
        destination = session.createQueue(destinationName);
      }
      producer = session.createProducer(destination);

      // Start the connection
      connection.start();
      String line;
      BufferedReader in = new BufferedReader(new InputStreamReader(System.in));
      do {
        System.out.print("Enter some text to be sent in a message <ENTER to finish>:");
        System.out.flush();
        line = in.readLine();
        if (line!=null){
          if(line.trim().length()==0){
            break;
          }
            TextMessage message = session.createTextMessage(line);
            // And, send the message
            producer.send(message);
            System.out.println("Sent message:\n" + message);
          }
        }
      while (line != null);

      recordSuccess();
    }
    catch (JMSException | IOException jmsex) {
      recordFailure(jmsex);
    }
    finally {
      if (producer != null) {
        try {
          producer.close();
        }
        catch (JMSException jmsex) {
          System.out.println("Producer could not be closed.");
          recordFailure(jmsex);
        }
      }

      if (session != null) {
        try {
          session.close();
        }
        catch (JMSException jmsex) {
          System.out.println("Session could not be closed.");
          recordFailure(jmsex);
        }
      }

      if (connection != null) {
        try {
          connection.close();
        }
        catch (JMSException jmsex) {
          System.out.println("Connection could not be closed.");
          recordFailure(jmsex);
        }
      }
    }
    System.exit(status);
    return;
  } // end main()

  /**
   * Process a JMSException and any associated inner exceptions.
   *
   * @param jmsex
   */
  private static void processJMSException(JMSException jmsex) {
    System.out.println(jmsex);
    Throwable innerException = jmsex.getLinkedException();
    if (innerException != null) {
      System.out.println("Inner exception(s):");
    }
    while (innerException != null) {
      System.out.println(innerException);
      innerException = innerException.getCause();
    }
    return;
  }

  /**
   * Record this run as successful.
   */
  private static void recordSuccess() {
    System.out.println("SUCCESS");
    status = 0;
    return;
  }

  /**
   * Record this run as failure.
   *
   * @param ex
   */
  private static void recordFailure(Exception ex) {
    if (ex != null) {
      if (ex instanceof JMSException) {
        processJMSException((JMSException) ex);
      }
      else {
        System.out.println(ex);
      }
    }
    System.out.println("FAILURE");
    status = -1;
    return;
  }

  /**
   * Parse user supplied arguments.
   *
   * @param args
   */
 

  /**
   * Display usage help.
   */
  private static void printUsage() {
    System.out.println("\nUsage:");
    System.out
        .println("JmsProducer -m queueManagerName -d destinationName [-h host -p port -l channel] [-u userid -w passWord]");
    return;
  }

} // end class


 package org.jms.test;

import javax.jms.Connection;
import javax.jms.Destination;
import javax.jms.JMSException;
import javax.jms.Message;
import javax.jms.MessageConsumer;
import javax.jms.Session;

import com.ibm.msg.client.jms.JmsConnectionFactory;
import com.ibm.msg.client.jms.JmsFactoryFactory;
import com.ibm.msg.client.wmq.WMQConstants;


public class JmsConsumidor {

  private static String host = "localhost";
  private static int port = 1415;
  private static String channel = "PROVA";
  private static String user = "jordi";
  private static String password = "megafriki0";
  private static String queueManagerName = "PROVA";
  private static String destinationName = "PROVA";
  private static boolean isTopic = false;
  private static boolean clientTransport = true;

  private static int timeout = 15000; // in ms or 15 seconds

  // System exit status value (assume unset value to be 1)
  private static int status = 1;

  /**
   * Main method
   *
   * @param args
   */
  public static void main(String[] args) {
    // Parse the arguments
    //parseArgs(args);

    // Variables
    Connection connection = null;
    Session session = null;
    Destination destination = null;
    MessageConsumer consumer = null;

    try {
      // Create a connection factory
      JmsFactoryFactory ff = JmsFactoryFactory.getInstance(WMQConstants.WMQ_PROVIDER);
      JmsConnectionFactory cf = ff.createConnectionFactory();

      // Set the properties
      cf.setStringProperty(WMQConstants.WMQ_HOST_NAME, host);
      cf.setIntProperty(WMQConstants.WMQ_PORT, port);
      cf.setStringProperty(WMQConstants.WMQ_CHANNEL, channel);
      if (clientTransport) {
          cf.setIntProperty(WMQConstants.WMQ_CONNECTION_MODE, WMQConstants.WMQ_CM_CLIENT);
      }
      else {
          cf.setIntProperty(WMQConstants.WMQ_CONNECTION_MODE, WMQConstants.WMQ_CM_BINDINGS);
      }
      cf.setStringProperty(WMQConstants.WMQ_QUEUE_MANAGER, queueManagerName);
      if (user != null) {
        cf.setStringProperty(WMQConstants.USERID, "jordi");
        cf.setStringProperty(WMQConstants.PASSWORD, "zzzz");
        cf.setBooleanProperty(WMQConstants.USER_AUTHENTICATION_MQCSP, true);
      }

      // Create JMS objects
      connection = cf.createConnection();
      session = connection.createSession(false, Session.AUTO_ACKNOWLEDGE);
      if (isTopic) {
        destination = session.createTopic(destinationName);
      }
      else {
        destination = session.createQueue(destinationName);
      }
      consumer = session.createConsumer(destination);

      // Start the connection
      connection.start();

      // And, receive the message
      Message message;
      do {
        message = consumer.receive(timeout);
        if (message != null) {
          System.out.println("Received message:\n" + message);
        }
      }
      while (message != null);

      System.out.format("No message received in %d seconds!\n", timeout / 1000);
      recordSuccess();
    }
    catch (JMSException jmsex) {
      recordFailure(jmsex);
    }
    finally {
      if (consumer != null) {
        try {
          consumer.close();
        }
        catch (JMSException jmsex) {
          System.out.println("Consumer could not be closed.");
          recordFailure(jmsex);
        }
      }

      if (session != null) {
        try {
          session.close();
        }
        catch (JMSException jmsex) {
          System.out.println("Session could not be closed.");
          recordFailure(jmsex);
        }
      }

      if (connection != null) {
        try {
          connection.close();
        }
        catch (JMSException jmsex) {
          System.out.println("Connection could not be closed.");
          recordFailure(jmsex);
        }
      }
    }
    System.exit(status);
    return;
  } // end main()

  /**
   * Process a JMSException and any associated inner exceptions.
   *
   * @param jmsex
   */
  private static void processJMSException(JMSException jmsex) {
    System.out.println(jmsex);
    Throwable innerException = jmsex.getLinkedException();
    if (innerException != null) {
      System.out.println("Inner exception(s):");
    }
    while (innerException != null) {
      System.out.println(innerException);
      innerException = innerException.getCause();
    }
    return;
  }

  /**
   * Record this run as successful.
   */
  private static void recordSuccess() {
    System.out.println("SUCCESS");
    status = 0;
    return;
  }

  /**
   * Record this run as failure.
   *
   * @param ex
   */
  private static void recordFailure(Exception ex) {
    if (ex != null) {
      if (ex instanceof JMSException) {
        processJMSException((JMSException) ex);
      }
      else {
        System.out.println(ex);
      }
    }
    System.out.println("FAILURE");
    status = -1;
    return;
  }

  /**
   * Parse user supplied arguments.
   *
   * @param args
   */
  private static void parseArgs(String[] args) {
    try {
      int length = args.length;
      if (length == 0) {
        throw new IllegalArgumentException("No arguments! Mandatory arguments must be specified.");
      }
      if ((length % 2) != 0) {
        throw new IllegalArgumentException("Incorrect number of arguments!");
      }

      int i = 0;

      while (i < length) {
        if ((args[i]).charAt(0) != '-') {
          throw new IllegalArgumentException("Expected a '-' character next: " + args[i]);
        }

        char opt = (args[i]).toLowerCase().charAt(1);

        switch (opt) {
          case 'h' :
            host = args[++i];
            clientTransport = true;
            break;
          case 'p' :
            port = Integer.parseInt(args[++i]);
            break;
          case 'l' :
            channel = args[++i];
            break;
          case 'm' :
            queueManagerName = args[++i];
            break;
          case 'd' :
            destinationName = args[++i];
            break;
          case 'u' :
            user = args[++i];
            break;
          case 'w' :
            password = args[++i];
            break;
          case 't' :
            try {
              int timeoutSeconds = Integer.parseInt(args[++i]);
              timeout = timeoutSeconds * 1000;
            }
            catch (NumberFormatException nfe) {
              throw new IllegalArgumentException("Timeout must be a whole number of seconds");
            }
            break;
          default : {
            throw new IllegalArgumentException("Unknown argument: " + opt);
          }
        }

        ++i;
      }

      if (queueManagerName == null) {
        throw new IllegalArgumentException("A queueManager name must be specified.");
      }

      if (destinationName == null) {
        throw new IllegalArgumentException("A destination name must be specified.");
      }

      if (((user == null) && (password != null)) ||
          ((user != null) && (password == null))) {
        throw new IllegalArgumentException("A userid and password must be specified together");
      }

      // Whether the destination is a queue or a topic. Apply a simple check.
      if (destinationName.startsWith("topic://")) {
        isTopic = true;
      }
      else {
        // Otherwise, let's assume it is a queue.
        isTopic = false;
      }
    }
    catch (Exception e) {
      System.out.println(e.getMessage());
      printUsage();
      System.exit(-1);
    }
    return;
  }

  /**
   * Display usage help.
   */
  private static void printUsage() {
    System.out.println("\nUsage:");
    System.out
        .println("JmsConsumer -m queueManagerName -d destinationName [-h host -p port -l channel] [-u user -w passWord] [-t timeout_seconds]");
    return;
  }

} // end class


dissabte, 28 de gener del 2017


JWT JSON WEB TOKENS


Conocidos como jut, Lo mejor para ver como funcionan es probarlos con un par de web. 

1º crear un JWR con esta web http://jwtbuilder.jamiekurtz.com/
2º validar el token con esta otra https://jwt.io.

Los algorimos HSXXX son cifrados simetricos utilizan una sola key para cifrar y desencifrar.
Los algoritmos RSXXX son asimetricos de dos claves, conocidas compo cifrado de clave publica y privada.

el JWT se añande como parametro en la cabezera de los mensajes HTTP headers similar a las cookies pero con otra clave y el schema como abajo

Authorization: Bearer <token>

Se graba en Base64 y tiene tres partes, 


eyJ0eXAiOiJKV1QiLCJhbGciOiJIUzI1NiJ9.eyJpc3MiOiJob2xhbXVuZG8iLCJpYXQiOjE0ODU1OTA0NzcsImV4cCI6MTQ4NTU5MTQ3MSwiYXVkIjoiaG9sYW11bmRvIiwic3ViIjoiaG9sYW11bmRvIiwiR2l2ZW5OYW1lIjoiam9yZGkiLCJTdXJuYW1lIjoiam9yZGkifQ.Yc0YCif2SqOGIOzI30plzM17c0bvrH39Ji0Q-ZIWI1M

La parete rosa decodificada es un 'header' que indica el protocola utilizado , la parte rojo es como el bloque de abajo y lo ultimo es un algoritmo Has256( parte roja + clave)

{"alg":"HS256","typ":"JWT"}
{
    "iss": "holamundo",
    "iat": 1485590477,
    "exp": 1485591471,
    "aud": "holamundo",
    "sub": "holamundo",
    "GivenName": "jordi",
    "Surname": "jordi"
}

diumenge, 22 de gener del 2017


$http $timeout.

En AngularJS y es JavaScript no tiene hilos, asi que no se puede secuanciar en un hilo tareas. Las tareas se ejecutan parcialmente a turnos. Por eso al llamar a objetos de recursos externos puede haber resultdos raros como cambios en el orden.

    $http.get(url\API1).
                then(function successCallback(response) {
 $scope.myvariable= 'hola';
 console.log($scope.myvariable);

        }, function errorCallback(response) {
}

    $http.get(url\API2).
                then(function successCallback(response) {
$scope.myvariable= 'adios';
console.log($scope.myvariable);
        }, function errorCallback(response) {
}

En AngularJS puede pasar que el Output sea primero adios,hola y no hola y adios quees lo esperado mirando la secuencia.

Una manera de resolver esto o al menos cambiarlo es el uso de $timeout pr ejem

     $timeout(function (){
       $scope.myvariable=  haceralgo();
     },5000);

Aunque lo mas seguro es sincronizar las llamadas en el then.success asi

    $http.get(url\API1).
                then(function successCallback(response) {
 $http.get(url\API2).then(function successCallback(response) {

 }

        }, function errorCallback(response) { }

dilluns, 16 de gener del 2017


Una instacion de OpenStack contiene al mennos 4 tipos de nodos.

  • El contorlador. Controller node. Donde esta la 'identity' o autentificacion junto con las herramietas necesarias para el controlador como MariaDB o colas RabbitMQ
  • Network controller nodes.
  • Compute node. Aqui estan los hipervisions y sus maquinas
  • Storage. Cinder y Swift
Pues todo esto. bueno Swift no se puede instalar en un portail con 8GB de Ram. Lo primero es instalar una instancia de Unbutu 16 Server.y asignarle minimo 4 GB. 

Establecer instacion con Bridge Adapter para que lo podamos ver desde fuera y para poder poner Ip fija, aunque no es estrictamente necesario y se puede evitar pero si tenemos dchp es lo mas practico si se quiere reutilizar la instalacion..Editar el fichero sudo vi /etc/networking/interfaces y añadir las lineas con los valores que toquen. En particular la ip puede ser la misma que se detecta y se ve con ifconfig. Y los valores se pueden sacar del anfitrion. Es buno reinicar del todo para estar seguro de que todo esta OK.

La maqjina deberia tener acceso a internet . Mejor lo pobamos con un curl www.googl.com

sudo apt-get update PRIMERO de todo.

  • Use sudo apt-get install cloud-init
  • git clone https://git.openstack.org/openstack-dev/devstack
  • cd devstack
  • cd /samples y copiar el local.config en devstack e informar al menos los campos de abajo.
  • '[[local|localrc]]'
    ADMIN_PASSWORD=password
    DATABASE_PASSWORD=password
    RABBIT_PASSWORD=password
    SERVICE_PASSWORD=password
  • Y por ultimo ./stack.sh Y A CORRER. 
Tarda un buen rato asi que paciencia.

Despues desde el anfitrion se abre un navegador y user admin y el pwd que se le haya puesto.